Thursday, August 25, 2016

STRESS = PAIN = STRESS = PAIN PART 7: HOW IS PAIN PRODUCED?


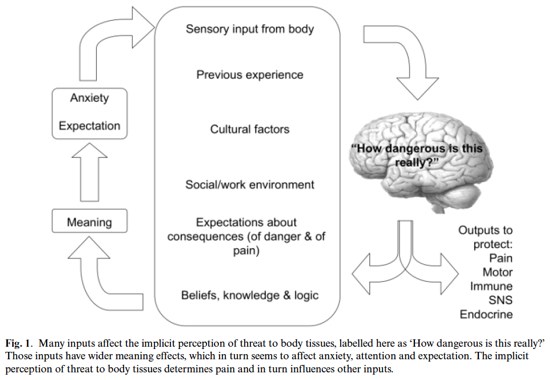
The body experiences a sensation where all of the new information of this sensation is sent to the brain for evaluation against the current information you have on this sensation. The current information is made up of what you felt and/or thought about the sensation in the past such as did it hurt, did it not, as well your personal beliefs on this sensation.
Depending on your evaluation the sensation will then be classed as safe or dangerous.
If it is deemed as safe then whatever pain you felt initially will decrease and go away pretty quickly.
If it is deemed as dangerous then the body will go into protection mode where it will send out pain signals to the area as well as shut off range of motion to the area by sending muscles into spasm.
This is all to stop you from doing anymore damage to the area.
This perception of danger will also cause a huge spike in sympathetic nervous system dominance.
Chronic pain occurs when pain perception is still high long after the initial injury, which has probably healed over time, or at the very least, has decreased it danger threat considerably.
Unfortunately when pain perception is still high and you’re still in a somewhat protective mode, then you develop what is called a neurotag. A neurotag is an encoded pattern in your central nervous system based on your evaluation process that can ingrain itself in specific and general movements - think along the lines of back pain while gardening versus back pain from simply bending.
Neurotags can be part of other neurotags that can trigger a similar response meaning if you have a lower back pain neurotag and a slipped disc neurotag, then activating one can activate the other so now you have 2 movements related to pain instead of one. 
Neurotags also reinforce themselves so more pain = more damage = more pain = more damage and so on.
The danger signals actually come from nociceptors and during prolonged bouts of firing such as chronic pain, they can become more sensitive which actually means they require less stimulus to activate and now the movement you used to be able to do with no problems and was perceived as safe, can now become an issue and cause pain.
This can get wired into your central nervous system causing all sorts of pain issues as now you’ll be getting pain signals from doing nothing but you haven’t sustained an injury.
Next Week: How to Decrease Pain.

Wednesday, August 17, 2016

STRESS = PAIN = STRESS = PAIN/ PART 6: WHAT IS PAIN?


The body’s tissue only experiences sensations and contains danger receptors, not actual pain receptors. 
This is important to know because when a sensation is experienced within the tissue, than all the information attained from that specific experience is sent to the brain and added to every other sensation stimulus you’ve ever encountered that is similar to this very one.
Pain correlates with danger, not injury.
If you suffer a dreaded paper cut injury, then you bleed which would initially send a dangerous signal to the brain.
The brain processes all the new information against the current information and as it’s seen this before and it knows that it isn’t an actual danger, then the pain signals aren’t sent out. 
You apply some pressure with a tissue and go about your day.

On the other hand of you slice your finger off chopping up the onions, then brain receives the same information but as you probably haven’t cut your finger off before, the information is skewed towards danger and a pain signal is now sent.
The end result is a pain experience.

Monday, August 15, 2016

Exercise of the Week - SPRINTING!


I've got Olympic fever and yesterday's 100 and 400m sprint finals were unbelievable, with the 200 and relays still to come!

If you're like me and have caught the fever then you're in for a treat with this weeks exercise of the week - sprinting!

No where enough people actually sprint which is a shame considering how good sprinters look and perform!

Most people will try and replicate sprinting through interval workouts that in reality is as far from sprinting as you can almost get as the speed you're going at is no where near top speed and that is what sprinting is all about.

Olympic sprinters are known for using what is called the high/low system which means they either train at 95 - 100% for high days or at 50 - 60% for low days.

They do not train "in the middle" which unfortunately is where everyone else in the world trains which is odd when you think about because if it was so good wouldn't they be doing it?

OK, what I'm going to GIVE you is a 6 week sprinting plan that you'll do 2/week and with the weather fining up, that shouldn't be a problem.

You'll have 12 sessions to complete preferably 3 - 4 days apart and I'll also include an introductory week that you do to prep for the work ahead. If you're hesitant then you can do this week twice.

Our measurements are going to go by counting our steps so you can do this workout without equipment. So each foot strike is 1 so count to 10, 20 or 30 (depending on the set), walk back slowly and repeat when you're breath has come back to pretty much normal.

You might be a bit short of breathe immediately after some of the hill sets but you should be able to complete each sprint with high quality so rest as needed to achieve this.

You're going to need to find 3 separate sprinting spots - a steep hill, a moderate hill and a flat surface.

A pretty good spot for this is Como Park that has hills around the Alexander Parade side of the oval that varies in distance as well as the killer hill on the other Toorak Road side.

A good idea is to time your 20m sprint sets in the 2nd prep session and we'll use that to see how much we improve after the 6 - 8 weeks which I think will be substantial - remember that .5sec of a huge improvement in the field of sprinting!

You'll want to measure out the testing sets so measure your feet with your running shoes on and divide 2000 by your foot length in cms (2000 / 35 for example) then simply step it out toe to heel style,

To time your sprints simply video it on your phone and pop it through this free app and follow the steps from here which is based on jumping but it's still the same thing:

http://aussierulestraining.blogspot.com.au/2016/08/measuring-vertical-leap-with-vstopwatch.html

Alternatively contact me via the Facebook page and you can send it to me and I can do it for you!

IMPORTANT - make sure you perform a thorough warm up prior to each sprinting session. Do a little jog for 400m or so to increase body temp, then ease into some 10 and 20m run-throughs increasing the pace of each set slightly for 4 - 6 total warm up. Skip this at your peril!

Prep Week
Session 1 Steep Hill: 4 x 10 steps + 2 x 20 steps + 1 x 30 steps
Session 2 Flat Surface: 4 x 10 steps + 2 x 20 steps (time these sets) + 1 x 30 steps

Here's the full 12 session, 6 week workout:

Week 1
Session 1 Steep Hill: 5 x 10 steps + 2 x 20 steps + 1 x 30 steps
Session 2 Steep Hill: 6 x 10 steps + 3 x 20 steps + 1 x 30 steps

Week 2
Session 1 Steep Hill: 7 x 10 steps + 4 x 20 steps + 1 x 30 steps
Session 2 Steep Hill: 5 x 10 steps + 2 x 20 steps + 2 x 30 steps

Week 3
Session 1 Moderate Hill: 5 x 10 steps + 2 x 20 steps + 1 x 30 steps
Session 2 Moderate Hill: 6 x 10 steps + 3 x 20 steps + 1 x 30 steps

Week 4
Session 1 Moderate Hill: 7 x 10 steps + 4 x 20 steps + 1 x 30 steps
Session 2 Moderate Hill: 5 x 10 steps + 2 x 20 steps + 2 x 30 steps

Week 5
Session 1 Flat Surface: 5 x 10 steps + 2 x 20 steps + 1 x 30 steps
Session 2 Flat Surface: 6 x 10 steps + 3 x 20 steps + 1 x 30 steps

Week 6
Session 1 Flat Surface: 7 x 10 steps + 4 x 20 steps + 1 x 30 steps
Session 2 Flat Surface: 5 x 10 steps + 2 x 20 steps + 2 x 30 steps

After 4 - 5 days off do this session:

Testing Session; 5 x 10 steps + 2 - 3 x 20 steps (timing all sets)

Let me know any questions you have on this, otherwise good luck!

Thursday, August 11, 2016

STRESS = PAIN = STRESS= PAIN PART 5: BE ACTIVATED TECHNIQUE


The Be Activated (BA) muscle treatment protocol is a little something I came across about 2 years ago and is the brain child of a South African ex-pysio Doug Heel.

The goal of these treatments is to undo everything that stress does to you by recalibrating the body to do the 2 most important functions it can do - breathing and walking.

Breathing should be a primary function of the diaphragm. 

Initial movement is generated via the psoas through hip flexion (knee lift).

The diaphragm and psoas actually attach so they are directly affected by one another so when one has dysfunction, then they both will. 

The glute is the reciprocal muscle to the psoas (hip extension = leg going back behind the body) so it’s a hugely important muscle.
There are 3 zones in the BA treatment with zone 1 being the diaphragm, psoas and glutes. 

There are also zones 2 and 3 that go further out from the body but we'll worry about them another day.

Problems in zones 2 and 3 originate in zone 1 as zones 2 and 3 are compensation patterns from a pooprly functioning zone 1.

By activating zone 1, you’ll be able to achieve optimal breathing and movement efficiency and you'll also find that your chronic pain spots and stiff area's free up considerably.

Here's a video of performing a manual treatment on myself but it's a thousand times better when someone else does it so hit me up if you ant a treatment.


Thursday, August 4, 2016

STRESS = PAIN = STRESS = PAIN PART 4: DIAPHRAGMATIC BREATHING


Lie down on your back.
Take some deep breathes in your nose and breathe out through your mouth.
Film yourself doing this.
Go. I’ll wait...
....

Play that video back – what do you see?
Do you see your chest rising with each breath?
Do you see some stomach action but nowhere near as much as your chest?
How long does each breath take you to complete?

Here's what it might have looked like:


When you’re under stress the CNS gauges this stress and perceives it a something negative. In times of negative stress the body will go into conservation mode and down regulate whatever it can if it can find a more efficient way to do so.

The easiest way to alter your breathing rate is to shift the focus from long and full belly/diaphragmatic breathing to short and shallow shoulder/chest/neck breathing.

When you do this for long enough then your body becomes accustomed to this form of breathing and eventually makes it your dominant breathing pattern. This decreases the work of the diaphragm, weakening it and compromising oxygen delivery throughout the entire body which results in tiredness, poor blood flow which can result in high anxiety.

Loud sounds and bright lights/screens also feed sympathetic dominance which is why screen time needs to be decreased around bed time and is why you find it so hard to get to sleep even when you’re tired.

Short and shallow breathes is an indication of sympathetic nervous system activation which is what we need to use in times of stress. What can happen in this situation is that the brain goes into full protection mode which means it wants to decrease energy output which it can do by shutting off main muscle groups and altering posture by moving to a ‘fetus” like posture with rounded shoulders, collapsed rib cage and slumped spine.

Poor breathing can also drive us into a state of constant inhalation which again increases sympathetic NS activation.

Pain, pain killers and anxiety all feed sympathetic dominance as well.

Do you constantly feel like you’re movement is restricted?

Do you sleep poorly?

Are you a busy, A type personality?

Do you have a lot of health issues?

Have you worked on your posture but to no avail?

Poor posture can be a symptom of a tired body which is a symptom of high stress.

Shifting from sympathetic to parasympathetic dominance will result in faster recovery from times of stress, greater immunity, less chronic pain and the ensuring happiness!


Lastly, an overexcited/tired CNS can also overreact to small stressors.